Let’s make a paper plate Easter bunny!
Crafted with simple items like paper plates, pipe cleaners, cotton balls and felt or paper scraps, this paper plate bunny can take on different appearances…even elevated to Easter bunny art!

This is a cute Paper Plate Easter Bunny Craft that your kids will love making. We love paper plate crafts in our home and I know you’ll enjoy displaying this adorable Easter bunny craft that your kids can make.
Paper plate crafts always make the perfect preschool Easter craft.
How to Make a Paper Plate Easter Bunny
It’s amazing how simple every day objects can be transformed into something cute and creative in a matter of minutes. You’ll only need a few common craft supplies to make this Paper Plate Easter Bunny Craft.
It doesn’t take long to brighten our kitchen for Easter!
This article contains affiliate links.

Supplies Needed to Make Paper Plate Easter Bunny Craft
Instructions for Paper Plate Easter Bunny Craft

Step 1
First, take one of the paper plates and cut it into thirds, like shown.
You won’t need the middle piece.

The two sides will become bunny ears.

Step 2
Next, using scissors cut out of the light pink craft felt a shape that is smaller than the ears. This will become the inner part of the Easter bunny ear.
Paper plate craft tip: I just eye-balled it. Once you get the shape right, cut out an identical shape from the light pink felt.
Step 3
Glue the pink inner felt ear cut outs to paper plate ears with the school glue, like shown.

Step 4
Now let’s work on the Easter bunny head!
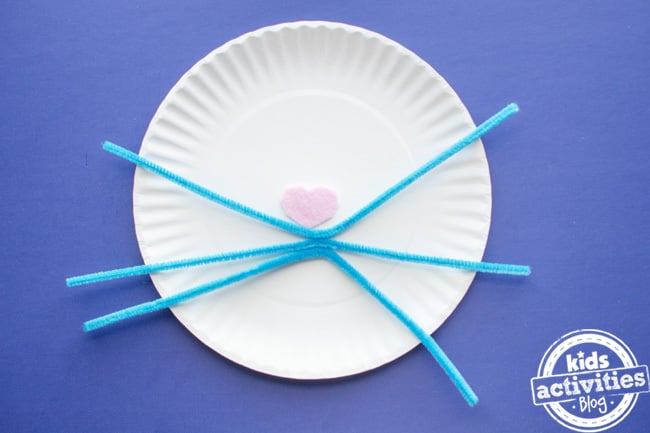
Make a small pink heart cut out from the pink felt.
Take the other paper plate and glue the small heart shape onto the middle of the plate with the school glue.

Step 5
Take your 3 pipe cleaners and glue them just under the nose with the hot glue gun. Bend the top and bottom whiskers slightly.
Paper plate craft tip: Older children can probably do this part on their own, but a grown up will need to help younger kids.

Step 6
Then glue the cotton balls onto the pipe cleaners with school glue, like shown below. We used 3 cotton balls on each side.

Step 7
Using the school glue, adhere the googly eyes onto the Easter bunny.
Then take a black marker and draw the mouth and teeth.

Step 8
Finally, you can attach the ears to your Easter bunny with a single staple per ear. For a finishing touch I used the remaining light pink felt and added a little bow tie for our Easter bunny. I also rounded out the top of my bunny’s ears.

Our Finished Paper Plate Bunny!
Isn’t this Paper Plate Easter Bunny Craft so adorable?!
We hope you have much making him as we did!
Step by Step Directions Review – Paper Plate Bunny

MORE BUNNY FUN FROM KIDS ACTIVITIES BLOG

How did your paper plate Easter bunny craft turn out?
Source: https://kidsactivitiesblog.com/25932/how-to-make-an-easter-bunny/
The content is owned by Deirdre. Visit site here for other valuable articles.

No comments:
Post a Comment